COMPANION RESCUE
Throughout the season, take steps to improve your companion rescue skills. You need to be good at this, and there’s much more to it than just searching with a transceiver. Rescue skills include the knowledge of:
- Practicing rescue
- Performing a rescue
- What to do if you're caught
It should be obvious that companion rescue skills only serve to reduce the consequences of an accident, and don't help prevent them. Being good at rescue is no excuse for allowing accidents to happen in the first place! A significant percentage of avalanche fatalities are due to trauma and not suffocation. A quick rescue would not change the outcome of these accidents.
Practicing Rescue
Strong companion rescue skills include the knowledge to organize good practice sessions with your partners, and the initiative to act on it. An easy way to achieve this is for you and your partners to take a formal Companion Rescue class, and then repeat the exercises regularly, until you retake the class again as a refresher. The details are just different enough between motorized and non-motorized techniques that you should try to find a class dedicated to the way you travel in the backcountry.
To practice outside of a structured class, use a combination of short breakout sessions and dedicated longer sessions. Any practice needs to be done in non-avalanche terrain, since you’ll be using rescue equipment instead of wearing it, and turning transceivers on and off.
For short breakout sessions, focus on just one component of rescue. Digging skills, probing skills, and transceiver skills can all be practiced separately to save time and minimize the impact on your backcountry day.
Emphasis should be on developing proper technique instead of speed. As technique improves, speed follows. Once you and your partners feel ready, it’s ok to introduce time-based competition, but if you do this too soon, you’ll encourage shortcuts that can lead to bad technique. Proper technique is described in this chapter, and is also available in video format here, and at the websites of most manufacturers of companion rescue equipment.
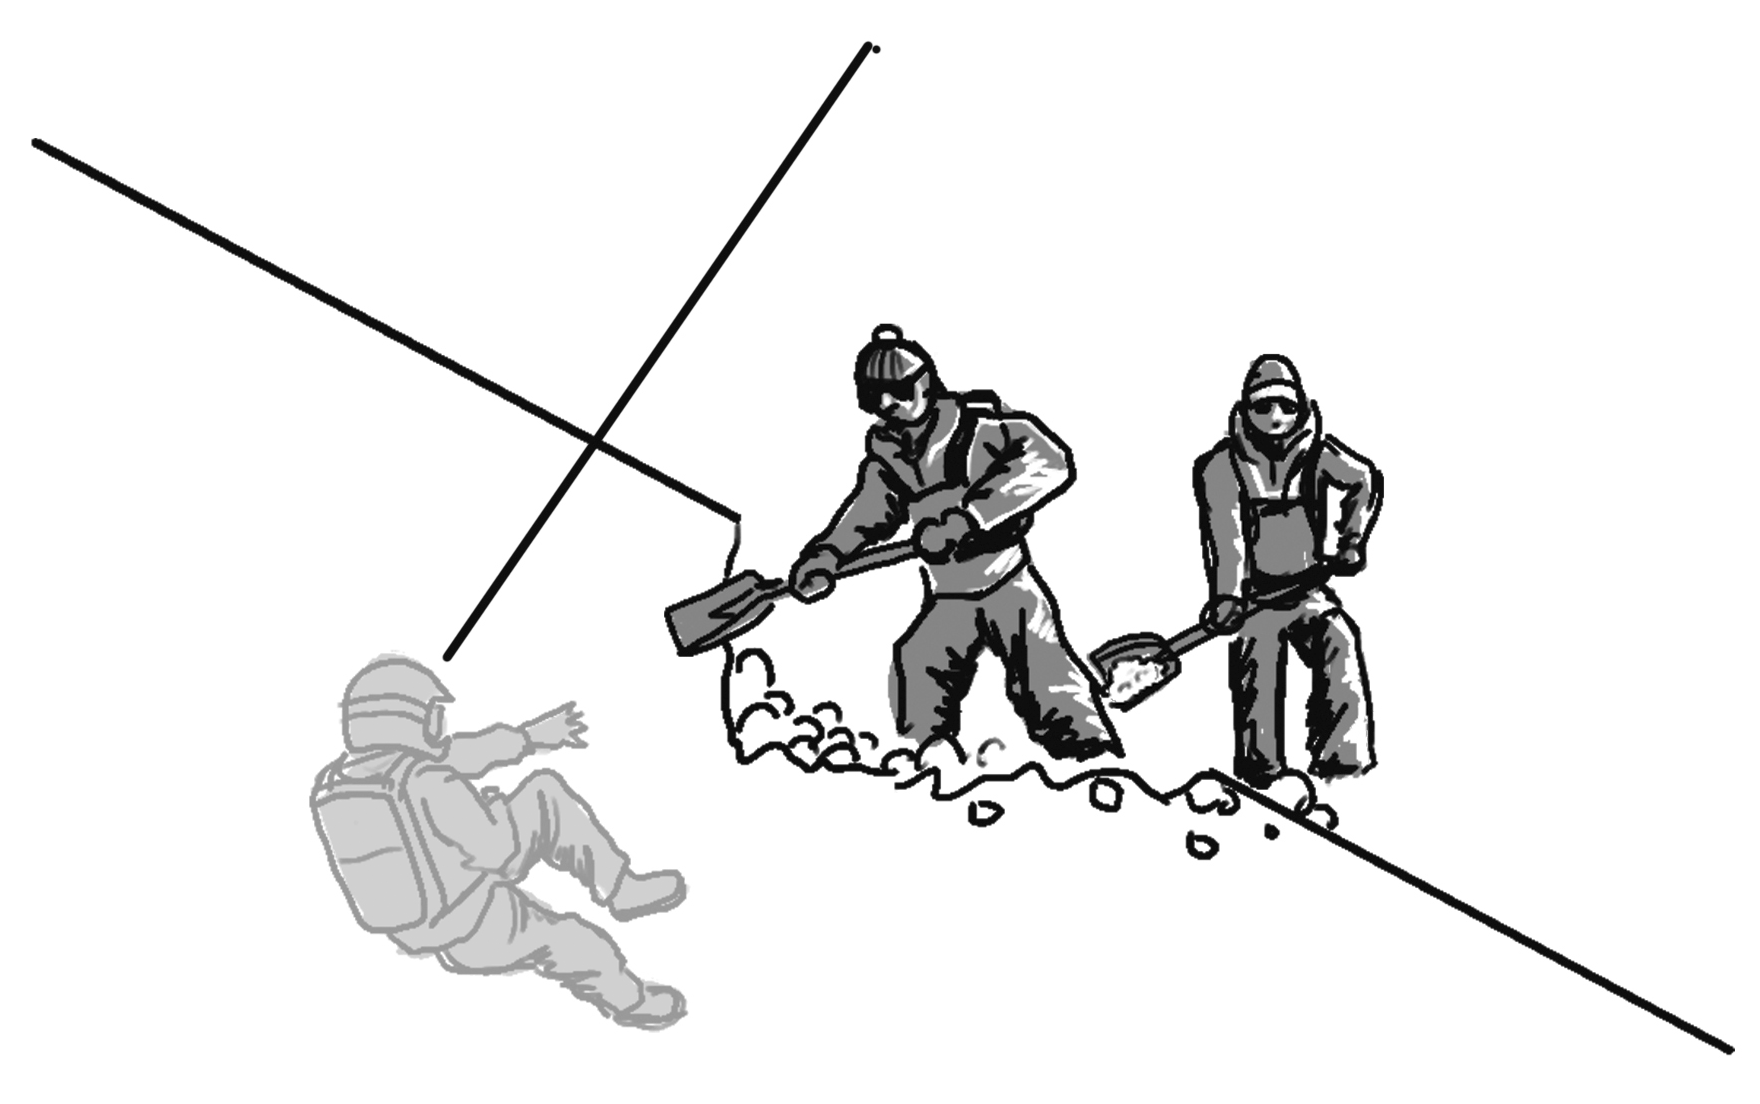
For digging practice, it’s helpful to have high density snow like avalanche debris would be. If you come across a recent avalanche, take advantage and spend a few moments practicing there. If your trailhead is plowed, the snow piles are also good places for digging practice.
- Step back from the probe, a little farther away than the depth of the burial, or about 1.5x away if you want to do the math. Move downhill if you’re on a slope.
- Organize rescuers into a “V” shape, with one or two people at the front, and more people behind. If only two rescuers are available, they can work side-by-side or front-to-back.
- Rescuers can stand on steeper slopes or kneel on less steep slopes, and hold shovels on the side away from the rescuer they’re next to (to prevent injuring a fellow rescuer).
- Using chopping motions instead of prying motions, dig down and forward towards the bottom of the probe. Rescuers in front move the snow to the rescuers behind, and subsequent rescuers move that same snow.
- If enough rescuers are available, rotate positions regularly. The rescuers at the front of the “V” will tire quickly.
Again, practice this correctly before adding speed. Once you do add speed, you can create incentives by timing your friends and wagering on the results, or placing two probes side-by-side for direct competition.
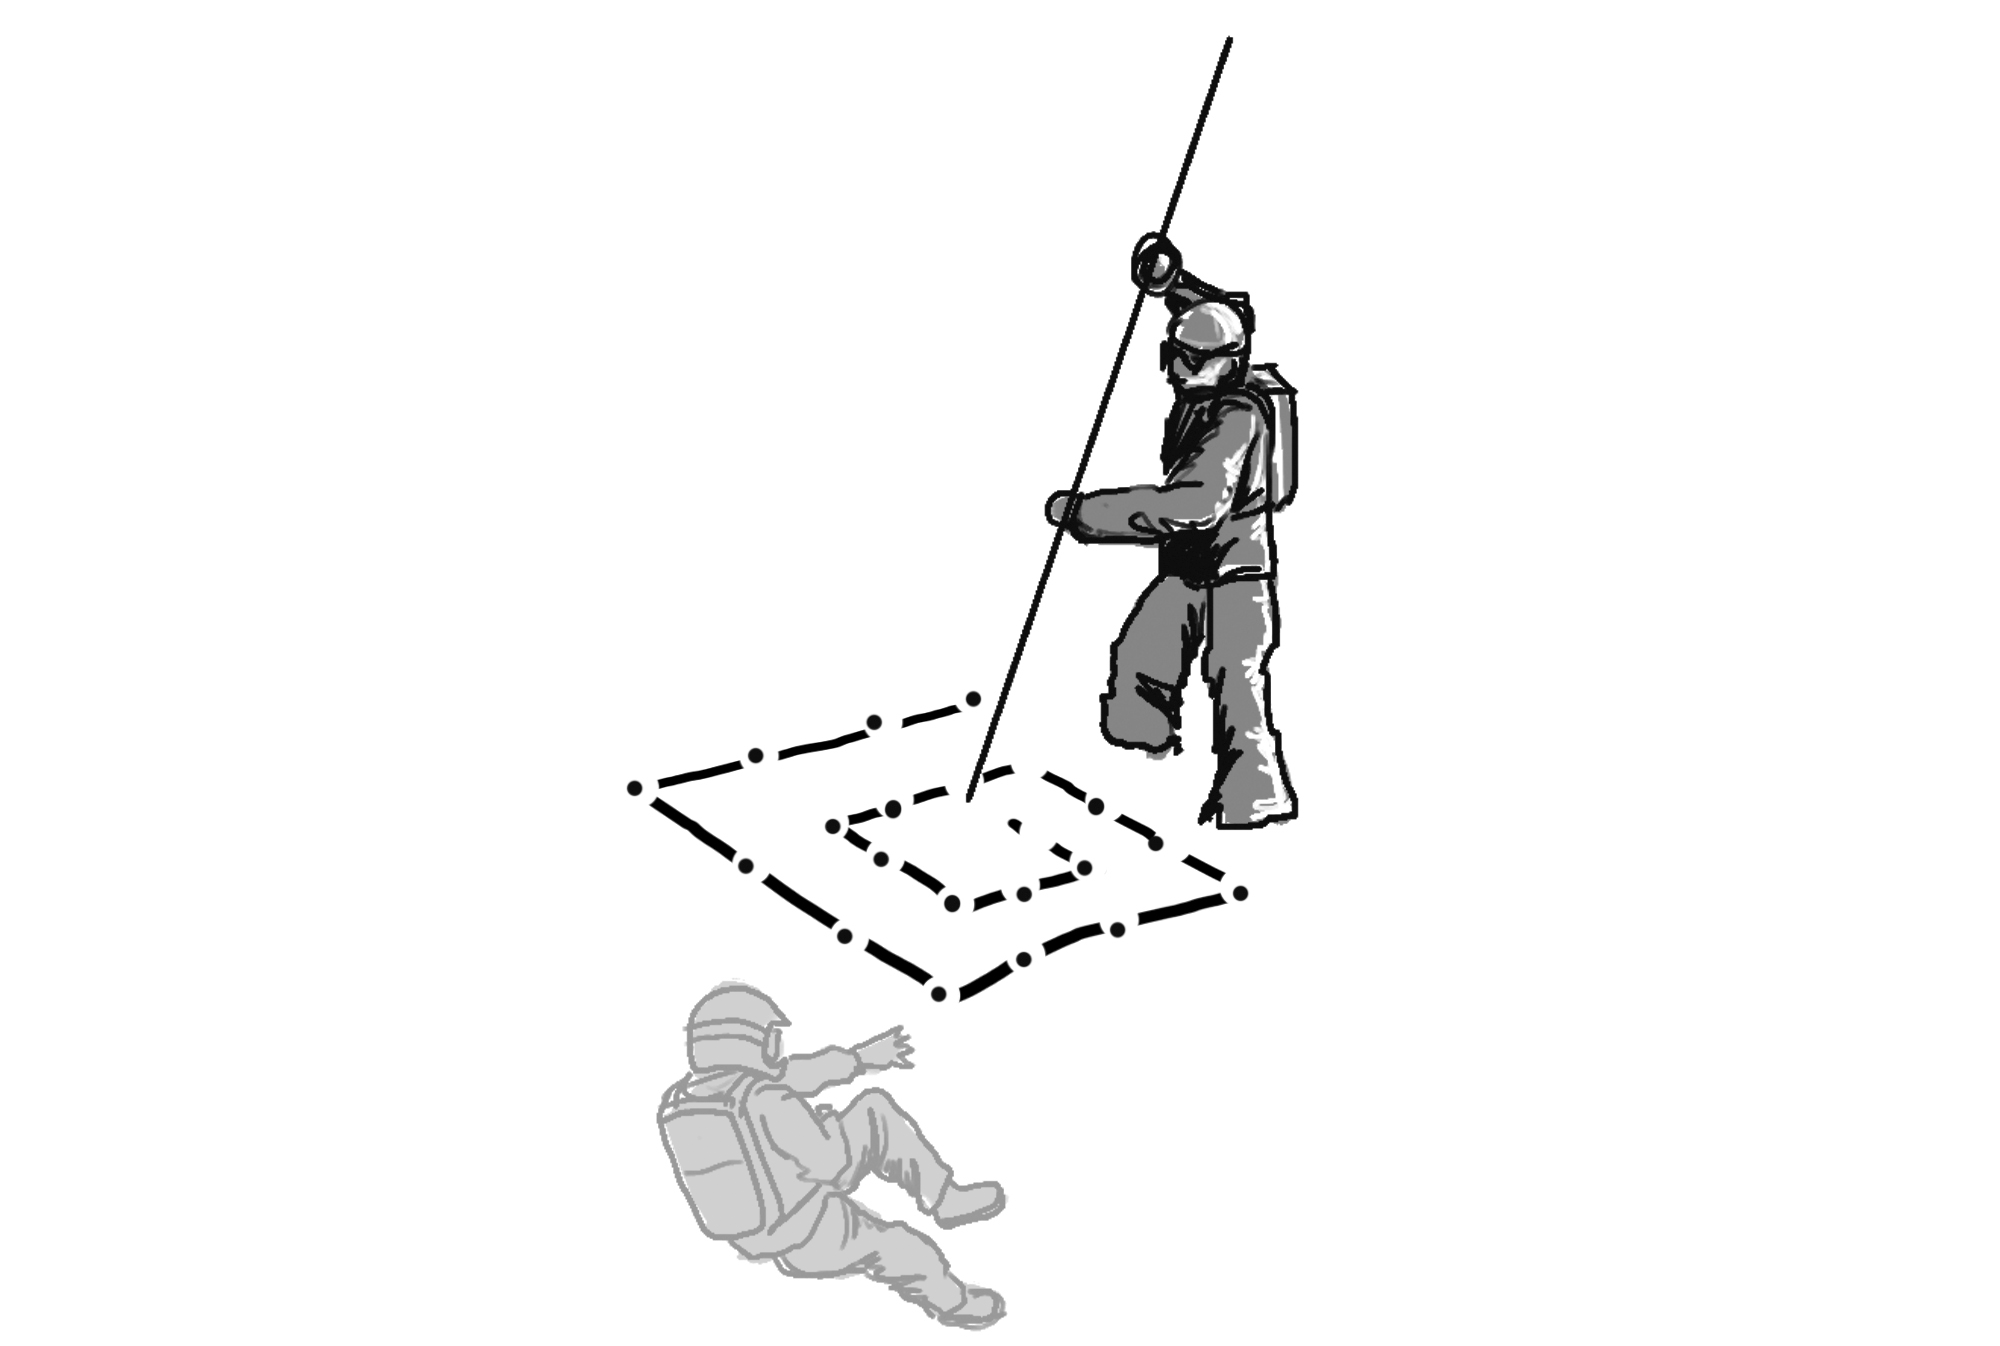
For probing practice, follow these steps:
- Probe around the area to make sure there’s enough snow for at least a 3ft burial, and to check for distracting items like buried rocks and logs. Distracting items can be helpful for learning purposes, but for initial practice they should be avoided.
- Bury something soft, like a backpack or tunnel bag. If you think there’s any chance you’ll lose track of the item you’re burying, place a transceiver on “send” into it. Bury the item with the durable side facing up, and remind your partners not to probe so hard as to damage it.
- Disturb the surface snow after burying the item so the general location is obvious, but the specific location is not.
- One-at-a-time, have your partners probe in an outward spiral, about 1ft between each attempt.
- Probing should be plumb if the area is flat. If you’re on a slope, probing should be 90o to the slope.
- Each attempt should go at least as deep as the suspected burial depth.
- Probing should be deliberate, not wild. You don’t want to damage whatever you buried, but deliberate probing will also make it easier to tell the difference between distracting items and the item you’re looking for.
- Encourage your partners to stay calm and stick with their pattern. Frustrated rescuers will want to resort to hunches and luck instead of following their pattern.
- After a successful probe strike, kick snow over probe holes and footprints for the next person to practice.
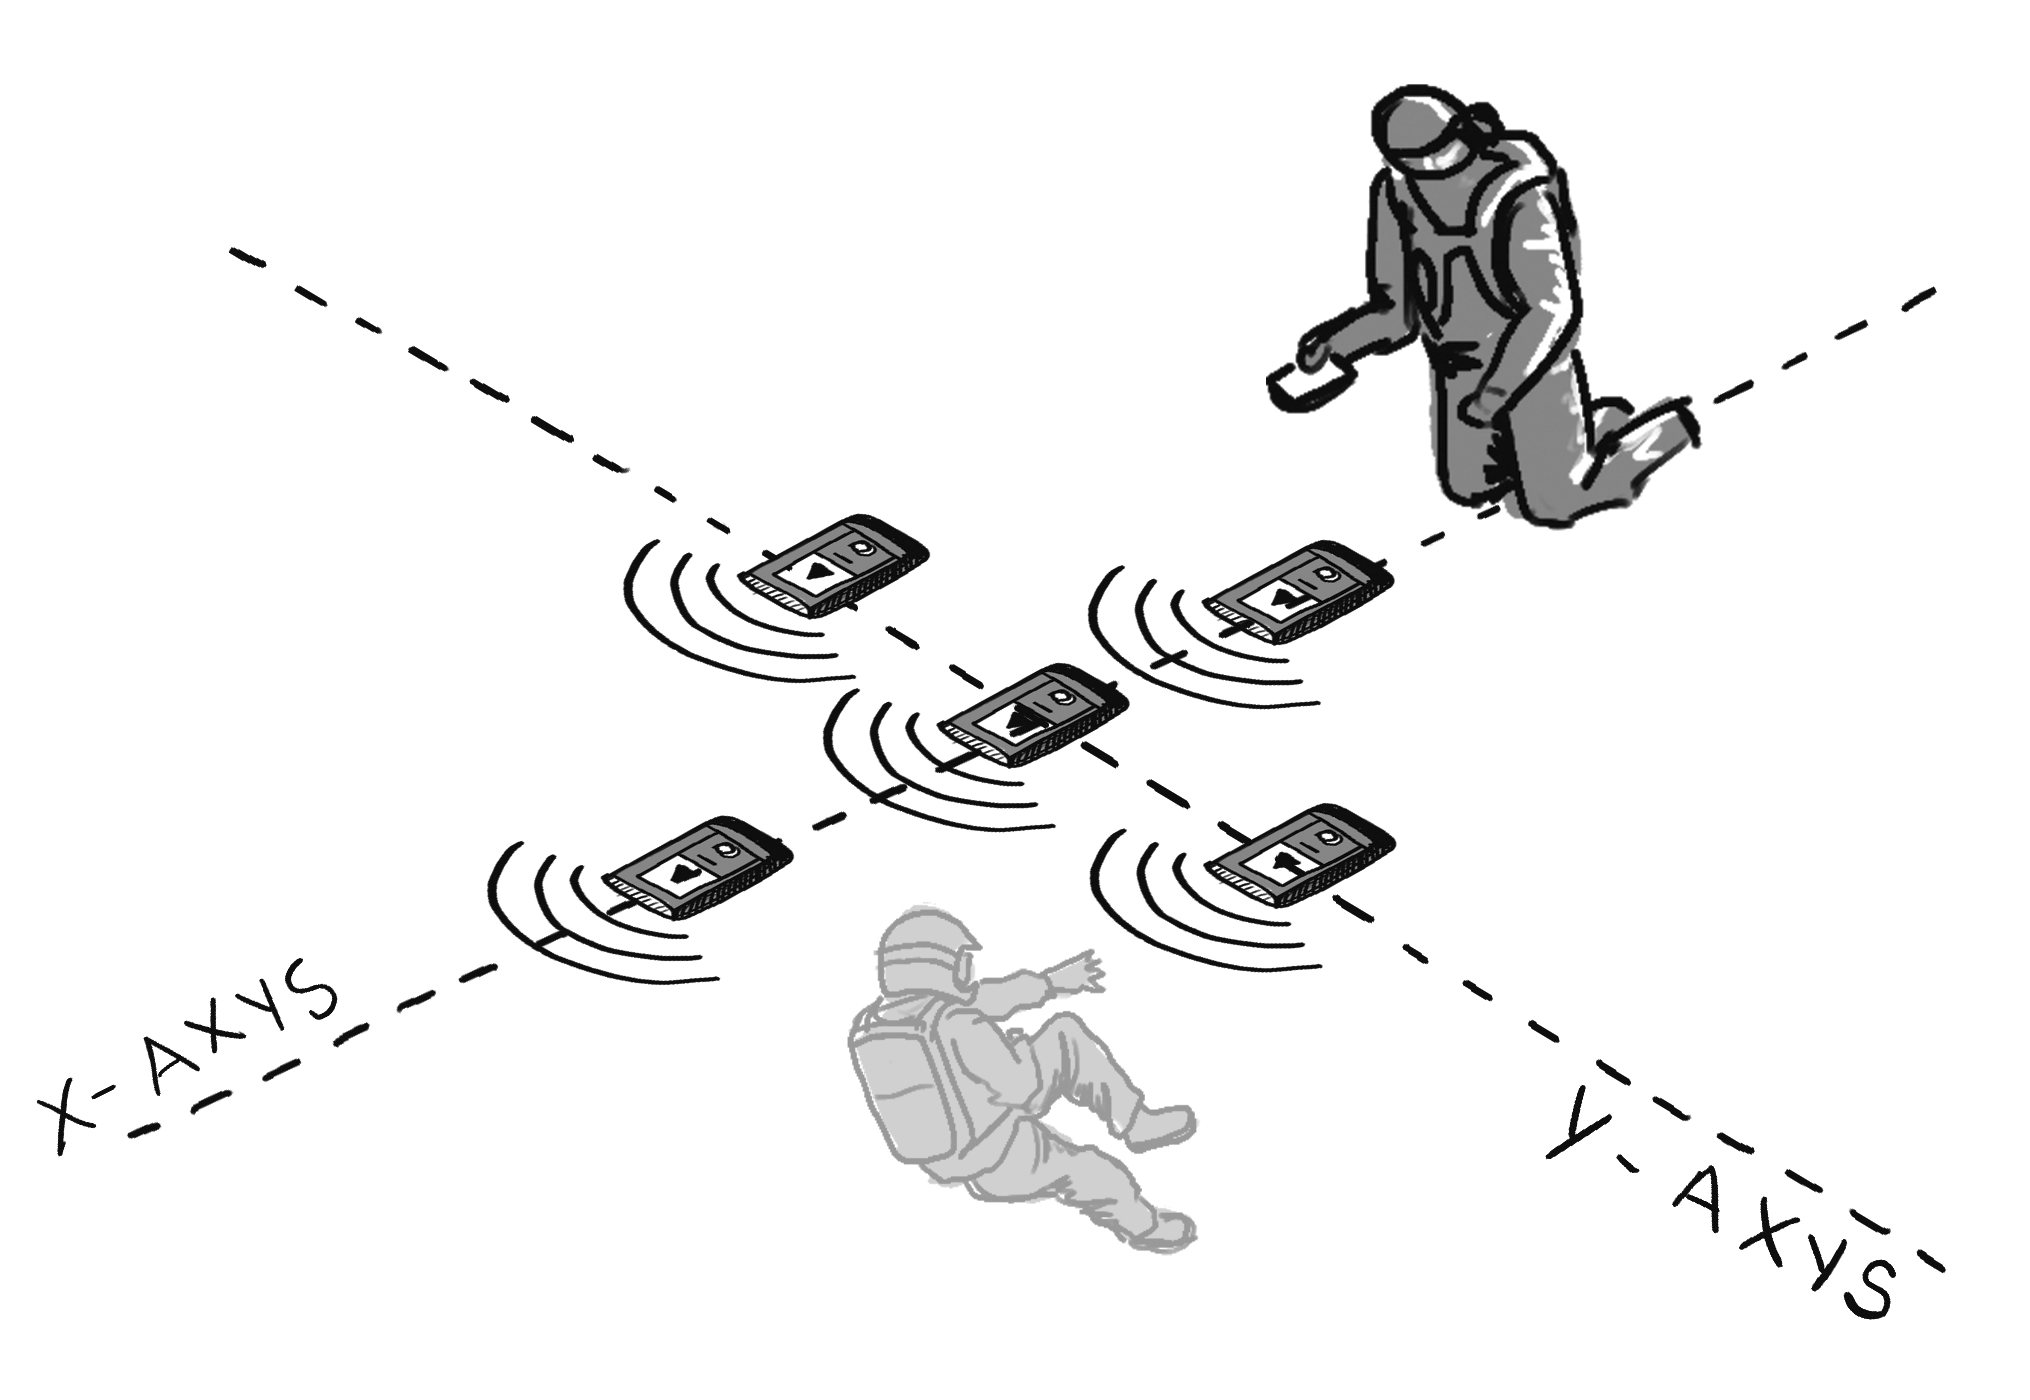
To set up transceiver practice, it’s helpful to have deep snow and a large, open area to stage the practice session. A meadow or low angled slope full of previous tracks, but without other people around, is ideal. Early season practice done without snow on the ground can still be valuable, but it doesn’t stand on its own - you need to practice on snow. Follow these steps:
- Place a transceiver on “send” in a backpack or tunnel bag and bury it at least 3ft deep. Have everyone else turn off their own transceivers.
- Disturb the area above and around the burial – the bigger the better to disguise the tracks you’ll create while practicing, but don’t waste too much precious practice time on this.
- Clearly define the boundaries of an imaginary debris pile, either verbally using obvious landmarks or by creating a boundary track in the snow.
- One-at-a-time, practice the Signal Search, Coarse Search, and Fine Search. For short breakout sessions, confirm the Fine Search by probing, but don’t waste time by digging up the buried item between each rescuer. It’s ok if people watch each other; it can help generate discussion and promote learning.
- Motorized users need to practice phases of the transceiver search on foot, because machines emit electronic signals that interfere with searching transceivers (AKA Electromagnetic Interference, or EMI). To shorten the time it takes for electronic interference to stop, many snowmobile models need to be shut down with the key instead of the kill switch. In an actual avalanche, you might need to get on and off your machine to search a large debris field, but for initial practice, keep it simple and do it all on foot.
- The Signal Search is done by zig-zagging through the debris until a signal is received. Different transceiver manufacturers recommend different spacing between each zig and zag, and to the edge of the debris. In general, prudent spacing is about 100ft between each zig and zag, and 50ft from the edge of the debris.
- The Coarse Search is done by following the directions of the searching transceiver. Keep the directional indicator in the middle and move forward so the numbers get smaller.
- The Fine Search needs to be very methodical. Slow is smooth, and smooth is fast. When the searching transceiver indicates a distance of 10, stop to assemble the probe and shovel. Skiers/snowboarders should take their equipment off their feet and leave it oriented to the direction the transceiver indicates. Move forward until the number 5, then place the probe flat on the snow in the direction the transceiver indicates. Keep the transceiver aligned with the probe for the rest of the search. Then on hands and knees, look for the lowest number along the probe without moving significantly to one side or the other. Once the lowest number along the probe is found, search perpendicular to it and find the lowest number along that axis. Mark this spot with the shovel, and keep it there for reference while probing.
The individual components that you’ve practiced in short breakout sessions are relatively easy when compared to performing a complete scenario. Even professionals who are very good at the individual components can be caught off guard by the confusion and complexity of a complete scenario – either practice or real.
To practice complete scenarios, choose a day when conditions aren’t very good, and make sure everyone agrees to spend a few hours without distraction. Set up and practice scenarios that simulate a rescue as described below.
Performing a Rescue
If a partner is ever caught in an avalanche, perform a rescue by following these steps:
- Alert your fellow spotters by yelling “avalanche.” Use the radio if necessary.
- Keep your eyes on the victim, and if they become buried, remember the last point at which you see them.
- Don’t allow anyone to start the rescue without someone taking charge (assumed to be you for this writing), leading a very brief discussion of the rescue plan.
- Assess rescuer safety. Look for any remaining snow above the avalanche that could still release. Decide with your partners if you can safely approach the last point seen.
- Once you’ve agreed to proceed, have all rescuers switch their transceivers to search, and confirm that this has been done. A real accident site will be chaotic enough without inadvertent transmitting signals – you can’t afford to miss this step.
- Assign tasks to rescuers, as resources allow.
- Turn off radios, which can interfere with searching transceivers.
- Go to the last point seen. Motorized users can ride machines, but sometimes debris will be difficult or impossible to ride through. Keep your eyes open for clues as you do this. If you have the resources, some rescuers can begin searching near clues.
- Begin a Signal Search at the last point seen. If you have the resources, divide responsibility for searching the debris (“You search left, I’ll go right”).
- As soon as anyone receives a signal, they need to yell to everyone else so that resources aren’t wasted on a duplicated Coarse Search.
- The person with the signal continues with the Coarse Search while everyone else turns their transceivers off (or put away while still in “search” mode) and assembles shovels.
- The person closest to the likely burial site should assemble their probe, and await direction from the person performing the Coarse Search.
- Once the searching transceiver indicates the number 10, the person probing can begin just in case they get lucky.
- After a Fine Search indicates the burial site, probe and dig as described in the practice section earlier.
What to Do if You're Caught
If you’re ever caught in an avalanche, follow these steps as best as you can:
- Deploy your airbag if you have one. Don’t hesitate to do this. Commit to deploying it without thinking about the headache of repacking it, or calculating your chances of outrunning the avalanche.
- Try to move out of the avalanche. Downhill and to the side is the most obvious way to move, though motorized users may have other options. Recognize that outrunning an avalanche to the very bottom is unlikely, and you might expose yourself to additional trauma in the attempt.
- Motorized users - once you become separated from your machine, do what you can to maintain that separation to minimize trauma and avoid getting buried under it.
- Use a swimming motion to try to stay above the moving debris. Face upwards, with your feet downhill to absorb impacts.
- As the debris slows to a stop, do whatever you can to keep your head and airway exposed.
- If your head is going to get buried, maintain your airway with one hand, while you thrust the other towards the surface. If you manage to keep any part of your body exposed, it will greatly reduce the time it takes your friends to find you.
- Once buried, keep your airway clear and try to remain calm. Your partners are really good at rescue, right?

